How To Share Files Over WiFi
In this age of technology, CD/DVDs and pen drives are not fast enough when it comes to sharing files between 2 computers next to each other. Today nobody wants to insert a pen drive, copy the contents, remove it and place to the next computer, copy the contents. And what if there were more than 2 computers in queue for the same data?
Slow and tedious isn't it?
 |
| image credit: crossbowtech.com |
Today, almost every home or office uses WiFi as the internet connection and networking medium. Not only does this allow quick connection of multiple computers, tablets and other devices to the internet but also helps create a secure and fast internal connection between all devices. (Sometimes referred to as 'Homegroup' or 'Workgroup')
The wifi workgroup lets multiple devices share data to other connected devices. Its fast, easy and doesn't require any storage device to transfer data. One can simply turn on sharing for a file from his PC and access it from his laptop or can let his friend's access it, copy it or even edit it if required from their computers.
Better indeed, isn't it?
How To Share Files Over Wifi
So lets start with the tutorial on sharing files over a wireless network. In this tutorial I will be using a homegroup that I will create for my home devices. I'll be using a Windows 8 laptop so the exact steps may only work for Windows 8, but the procedure remains same for Windows 7 or XP.
1. Turn ON Sharing Between Devices.
First of all you need to enable sharing between you and other devices. Here is how to do it:
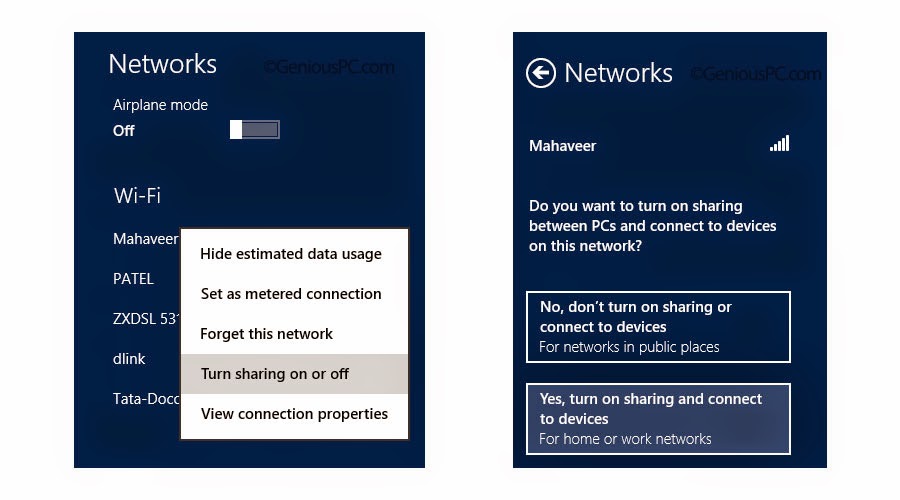
- Open up your wifi connection list.
- Tight click your wifi network that you are connected to, then go to turn sharing on or off.
- Select Yes .

2. Create a Homegroup And Make Other Devices Join It.
A homegroup is the group made of those devices which you want to share the files with. All computers in a single homegroup with sharing turned on can share files with each other over the wifi network.
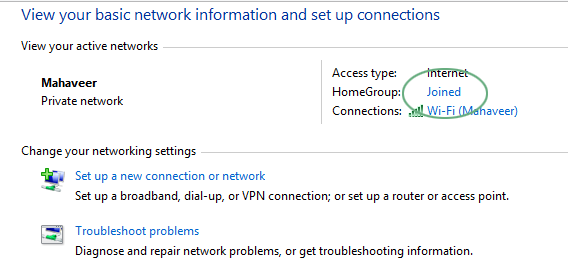
- Open Network & Sharing center while connected to the wifi network.
- Click on Create next to homegroup. Only one homegroup exists in a network. So once you create a homegroup, other computers will get the option to 'join' rather than 'create'. You will have to choose a membership password while creating the homegroup which other computers or devices will need to join the homegroup.
- You can always check the homegroup settings in Windows 8 by opening the charms > settings > change PC settings and viewing homegroup settings.


3. Sharing Folders Over The Homegroup
This is the last step of this tutorial. Now that you have a working Homegroup and have turned ON sharing from your device, you just need to select the folder you want to share.
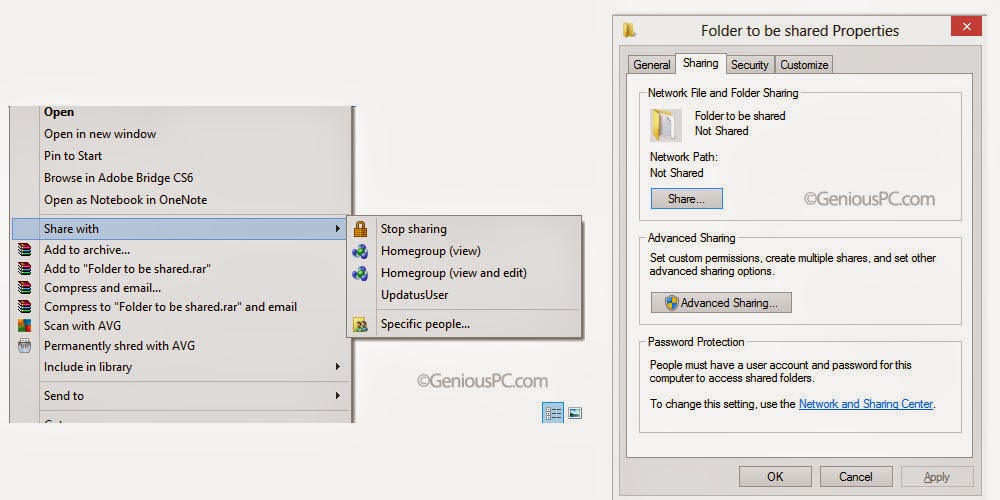
- Right click the folder to be shared, goto share with> Homegroup (view) or Homegroup(view and edit). If you want others to be able to edit your shared files, select the 'view and edit' option, else you can choose the other one ie 'view'.
- OR you can right click the folder and open its properties, go to sharing and click share. Select the homegroup or specific people from the drop down box and assign them the required permissions.

That's it. The files will now be available on all compatible devices on the homegroup.
But where? Just open 'My Computer' and check the left sidebar (navigation pane) for 'Homegroup'. You might have to enable navigation pane. Or you can just enter 'Homegroup' without quotes directly into the address bar of your explorer.
Open you username's folder and that's where all your shared files would be.
Bonus: Video Tutorial On Sharing Files Over WiFi
Subscribe to our YouTube channel here.
Your views!
Have any doubt or problem working with the method described here? Do comment and let me know. I will be ready to solve your problems. And do share with your friends if you found this tutorial helful! Happy sharing and keep visiting.


